
Temenos Lifecycle Management Suite - Collection Product Guide
Workday Schedules
| Administrator Guide > Cases > Workday Schedules |
The Workday Schedules provides administrators the ability to define one or many calendars to include workdays and exclude days such as holidays and weekends. By default, calendar days are used with a default start time of 8:00 AM and end time of 5:00 PM. Workday schedules are also used in calculating the duration of a task.
 |
Administrators can change the default setting for start and end times on the Administrative Settings page. |
Administrators can use workday calendars for many reasons such as if a financial institution, or a department within a financial institution, is not operating 7 days a week including holidays. In this scenario, it is recommended that the administrator define a working day calendar to define which days in the calendar year should be included when calculating a task's due date.
If different departments or areas have varying working days, multiple workday schedules can be created to ensure task due dates and Key Performance Indicators (KPI's) are calculated accurately.
By navigating to the System Management > Workday Schedules page, administrators can create new workday schedules, copy existing workday schedules, edit existing workday schedules, and delete workday schedules.
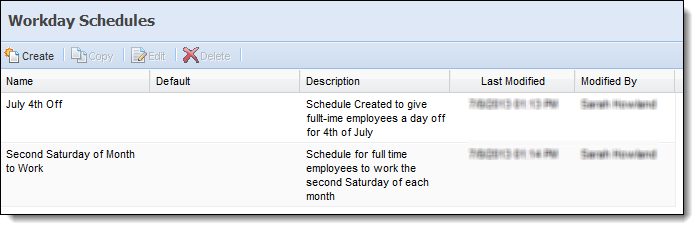
The Workday Schedules page contains the following columns:
| Column Name | Description |
| Name | Name of the workday schedule. |
| Default | Displays whether the schedule is default. |
| Description | Description of the workday schedule. |
| Last Modified | Denotes when the last modification was made. |
| Modified By | Denotes who made the last modification. |
All workday schedules share common attributes that are defined while creating, copying, and editing a Workday Schedule.
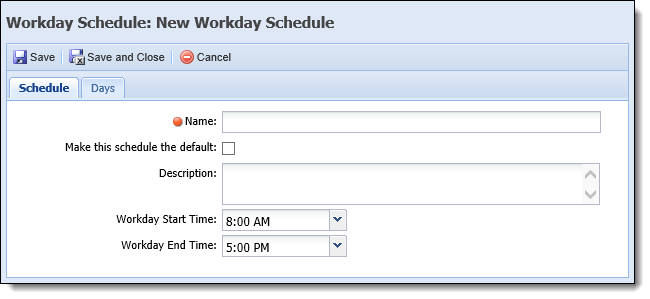
Schedule attributes are located within the Schedule Tab:
| Field | Description | ||
| Name | Enter the name for the new Workday Schedule. This is a required field. | ||
| Make this schedule the default |
Check this box to make this the default schedule for users in the Lifecycle Management Suite.
|
||
| Description | Enter a description to provide more specific information about the new Workday Schedule. The description can be seen by administrators on the Workday Schedules system management page. | ||
| Workday Start Time | Select the start time of a workday from the drop-down list. This is a required field. | ||
| Workday End Time | Select the end time of a workday from the drop-down list. This is a required field. |
|
In the Lifecycle Management Suite, time is formatted in quarter hour increments. |
When finished entering the fields in this tab, click Save. The Workday Schedule must be created and saved successfully before any days can be assigned to it. If a user advances to the Days tab without a record having been saved, the tab contents do not appear and a message displays stating, “the schedule record must first be saved.”
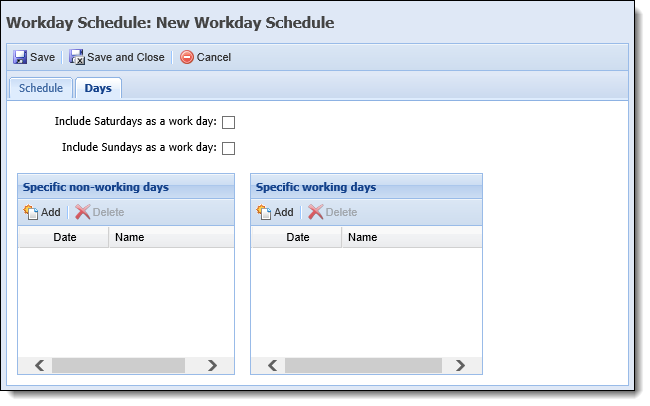
Days attributes are located within the Days Tab:
| Field | Description |
| Include Saturdays as a work day | Select the check box to include Saturday in the default work schedule. |
| Include Sundays as a work day | Select the check box to include Sunday in the default work schedule. |
| Specific non-working days |
Click Add. A new entry appears with today’s date as default.
|
| Specific working days |
Specify working days to override a default "do not include Saturdays/Sundays as a work day" choice to make a specific Saturday or Sunday calculated as a work day. To add working days:
|
|
When a Workday Schedule is saved, it lasts for two years. After two years, the schedule restores back to the default and must be re-configured. |
To create a new Workday Schedule click Create.
The New Workday Schedule screen appears. Navigate through the Schedule sand Days tabs to update attributes.
When finished entering all information for the new workday, click Save and Close to save the new workday schedule and return to the Workday Schedule page. The Workday Schedule populates in the list. Click Cancel to return to the Workflow Schedule page without saving.
The new workday schedule can now be applied to the following items when configuring them in System Management:
Select to highlight the Workday Schedule that is to be copied, click Copy.
The Copy Workday Schedule screen appears. Navigate and make any necessary changes within the Schedule and Days tabs.
When finished, click Save and Close to save the new Workday Schedule and return to the Workday Schedules page. The Workday Schedule populates in the list and is available to apply to Task Templates and Task Processes. Click Cancel to return to the Workday Schedules list without saving.
Select to highlight the Workday Schedule to be edited, click Edit.
The Edit Workday Schedule screen appears. Navigate and make any necessary changes within the Schedule and Days tabs.
|
When a workday schedule is edited, all areas within the Lifecycle Management Suite that adhere to it will automatically pick up the modifications. |
When finished, click Save and Close to save the Workday Schedule and return to the Workday Schedules page. Click Cancel to return to the Workday Schedules list without saving.
Click to highlight the Workday Schedule that is to be deleted, click Delete.
A confirmation message appears. Click Yes to delete the Workday Schedule. Click No to return to the Workday Schedules page without deleting.
 Creating a Workday Schedule